Yesterday I was reading an excellent book called Tabletop Photography, by Cyrill Harnischmacher (Rocky Nook, 2012). The book includes a lot of good information about equipment and techniques for this sort of photography, and has some interesting examples. At page 77, I came across an example of a double exposure in which a violin was photographed in its case, with the case both open and closed, giving a sort of x-ray vision effect of seeing the violin inside the closed case. In discussing the technique he used to make this image, the author stated, “One prerequisite for doing this, of course, is that your camera have a multiple exposure mode.”
At that point, my mind immediately jumped to the Panasonic Lumix LX7 (and its near-twin, the Leica D-Lux 6), because the LX7 has a Multiple Exposure option on its Recording menu. I’m not sure how many cameras nowadays are equipped to do multiple exposures, but this is one of the few cameras that I’m aware of that can do this. So, I decided to see if I could come close to taking a double exposure like the one in Mr. Harnischmacher’s book.
I don’t have a violin, but I do have a ukulele, and it has a nice case. I set it up with a couple of flash units aimed at it, triggered by a radio transmitter. One great thing about doing the picture with the LX7 is that you can use this menu option with the Raw format and with the Manual exposure shooting mode, both of which I took advantage of. I selected the Multiple Exposure item on the Recording menu and started experimenting. I set the Auto Gain option of the Multiple Exposure menu item to Off, because I wanted to adjust the relative exposures of the two shots myself.
I found that, if I used the same exposure for both shots, the image of the ukulele in the open case overwhelmed the image of the closed case, so you could not see the closed case that well.
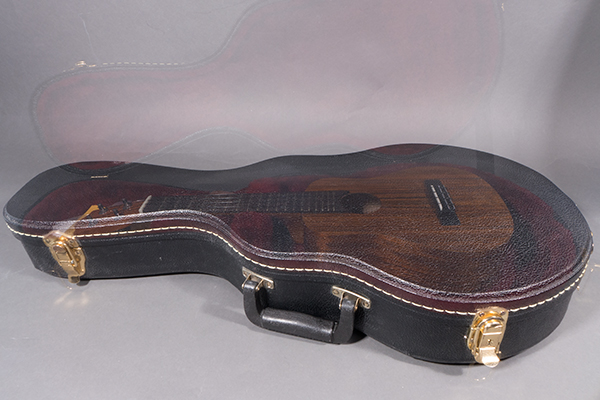
I wanted the final image to look as if you are seeing inside the closed case, so I reduced the exposure for the image of the ukulele in the open case. I used the ND (neutral density) filter option on the LX7 to do that, and ultimately I ended up by taking the shot of the instrument in the open case at f/8.0 with an exposure for 1/50 second at ISO 80, using the ND filter. (This exposure is equivalent to 1/400 second without the ND filter.) I took the shot of the uke in the closed case at f/8.0 for 1/320 second, which amounts to just a slightly longer exposure. Here is the final result:
This image basically accomplished what I set out to do–making it look as if you can see inside the closed case. I did not make any adjustments in Photoshop, other than doing a little bit of sharpening. I’m sure it could be improved in various ways, but I wanted to display it just as it came out of the LX7. Of course, you could do the same thing using the Leica D-Lux 6, which has almost all of the same menu options as the LX7.


